
6. rostopic, rosmsg, publisher, subscriber, package
지지난 강의의 마지막 부분에 등장했던 /cmd_vel을 기억하시나요?
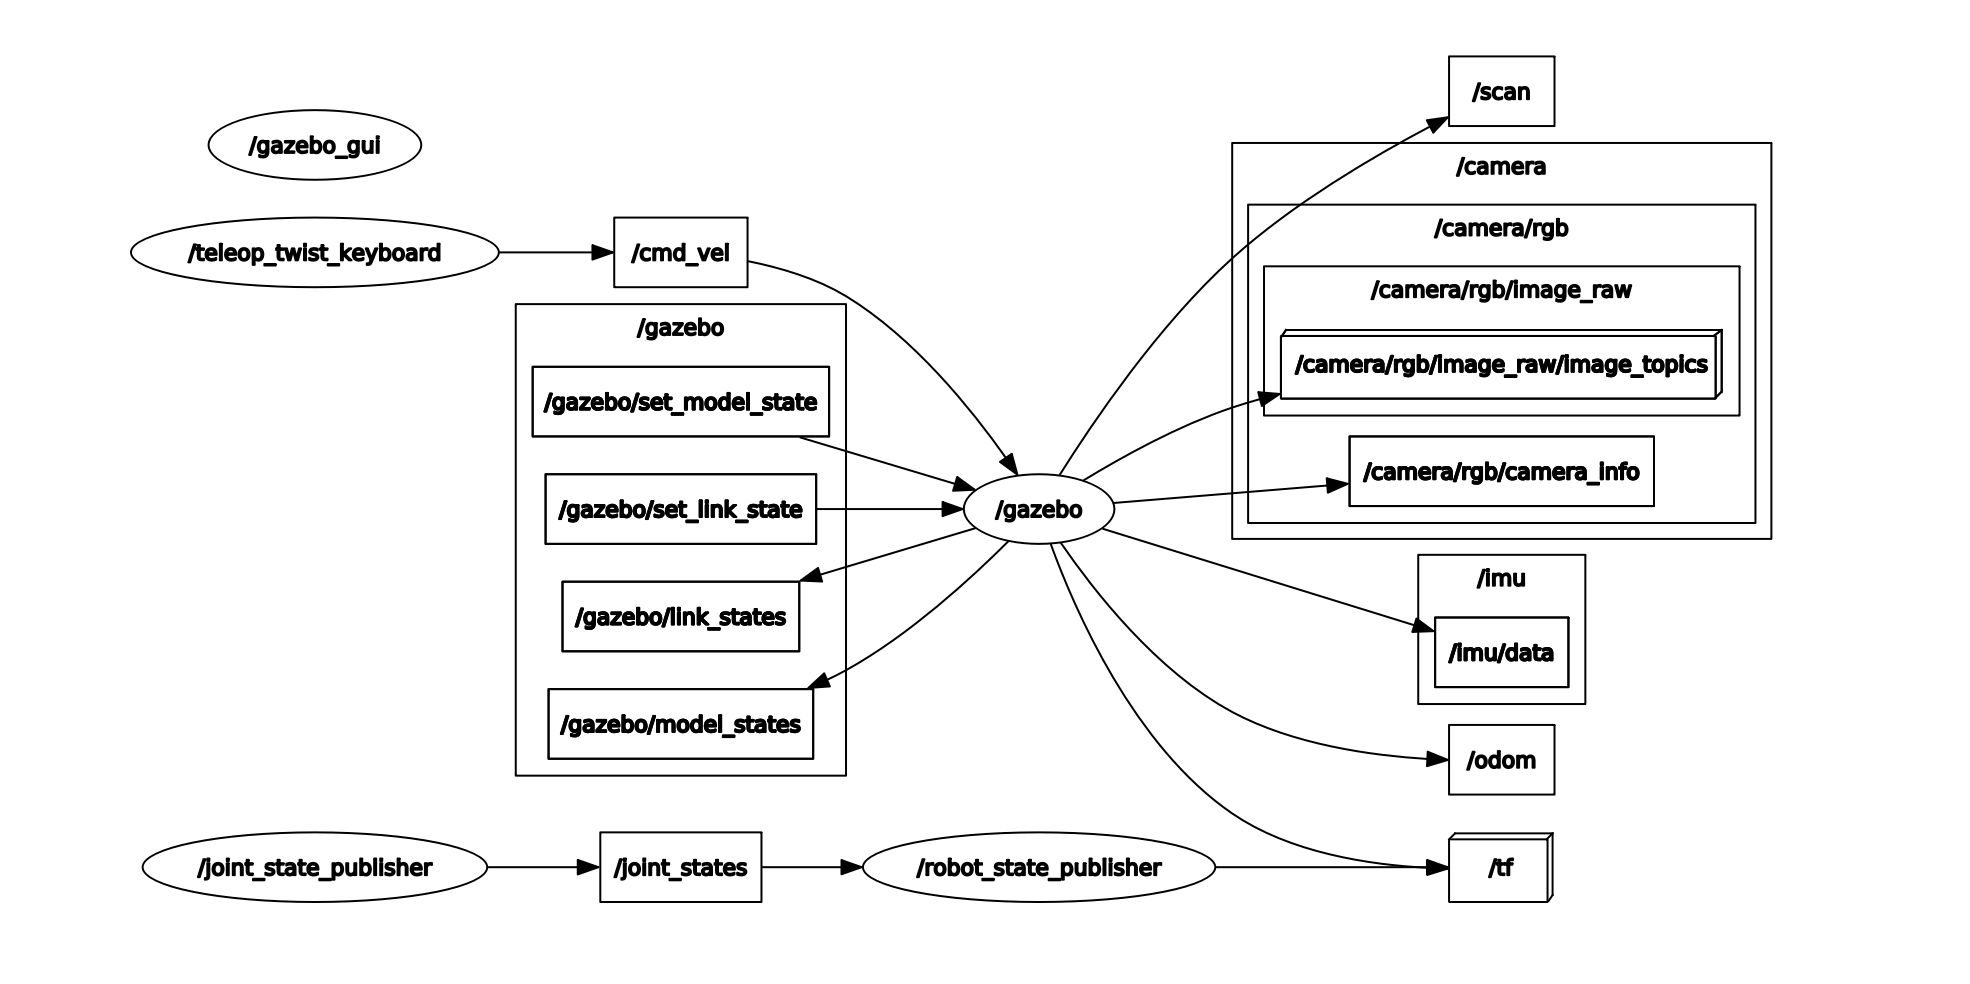
이는 command velocity의 약자로, 바퀴가 돌아가는 속도를 지정하여 로봇을 이동시킬 수 있는 topic입니다.
이번 시간에는 topic이 무엇인지와 topic의 주체가 되는 publisher, subscriber에 대해 배워봅니다.
우선, 예제를 먼저 실행시켜보겠습니다.
drive_forward 예제
몇가지 설정을 해줍니다.
$ roscd topic_tutorial
$ cd src && chmod +x *
$ cd ../
$ cd launch && chmod +x *
이제는 익숙한 gazebo_world
$ roslaunch gcamp_gazebo gazebo_world.launch
새 터미널을 열고 예제를 실행시켜봅니다.
$ roslaunch topic_tutorial example1.launch
... logging to /home/kimsooyoung/.ros/log/4ba42dba-4f1e-11eb-bcd5-9cb6d08bf543/roslaunch-kimsooyoung-XPS-13-9370-26434.log
Checking log directory for disk usage. This may take a while.
Press Ctrl-C to interrupt
Done checking log file disk usage. Usage is <1GB.

started roslaunch server http://localhost:36011/

SUMMARY
========

PARAMETERS
 * /rosdistro: melodic
 * /rosversion: 1.14.10

NODES
  /
    DriveForward (topic_tutorial/example_1.py)

ROS_MASTER_URI=http://localhost:11311

process[DriveForward-1]: started with pid [26457]
[INFO] [1609827784.715571, 0.000000]: ==== DriveForward node Started, move forward during 10 seconds ====

[WARN] [1609827794.715846, 770.036000]:  10 seconds left, Stop!!
[DriveForward-1] process has finished cleanly
log file: /home/kimsooyoung/.ros/log/4ba42dba-4f1e-11eb-bcd5-9cb6d08bf543/DriveForward-1*.log
all processes on machine have died, roslaunch will exit
shutting down processing monitor...
... shutting down processing monitor complete
done
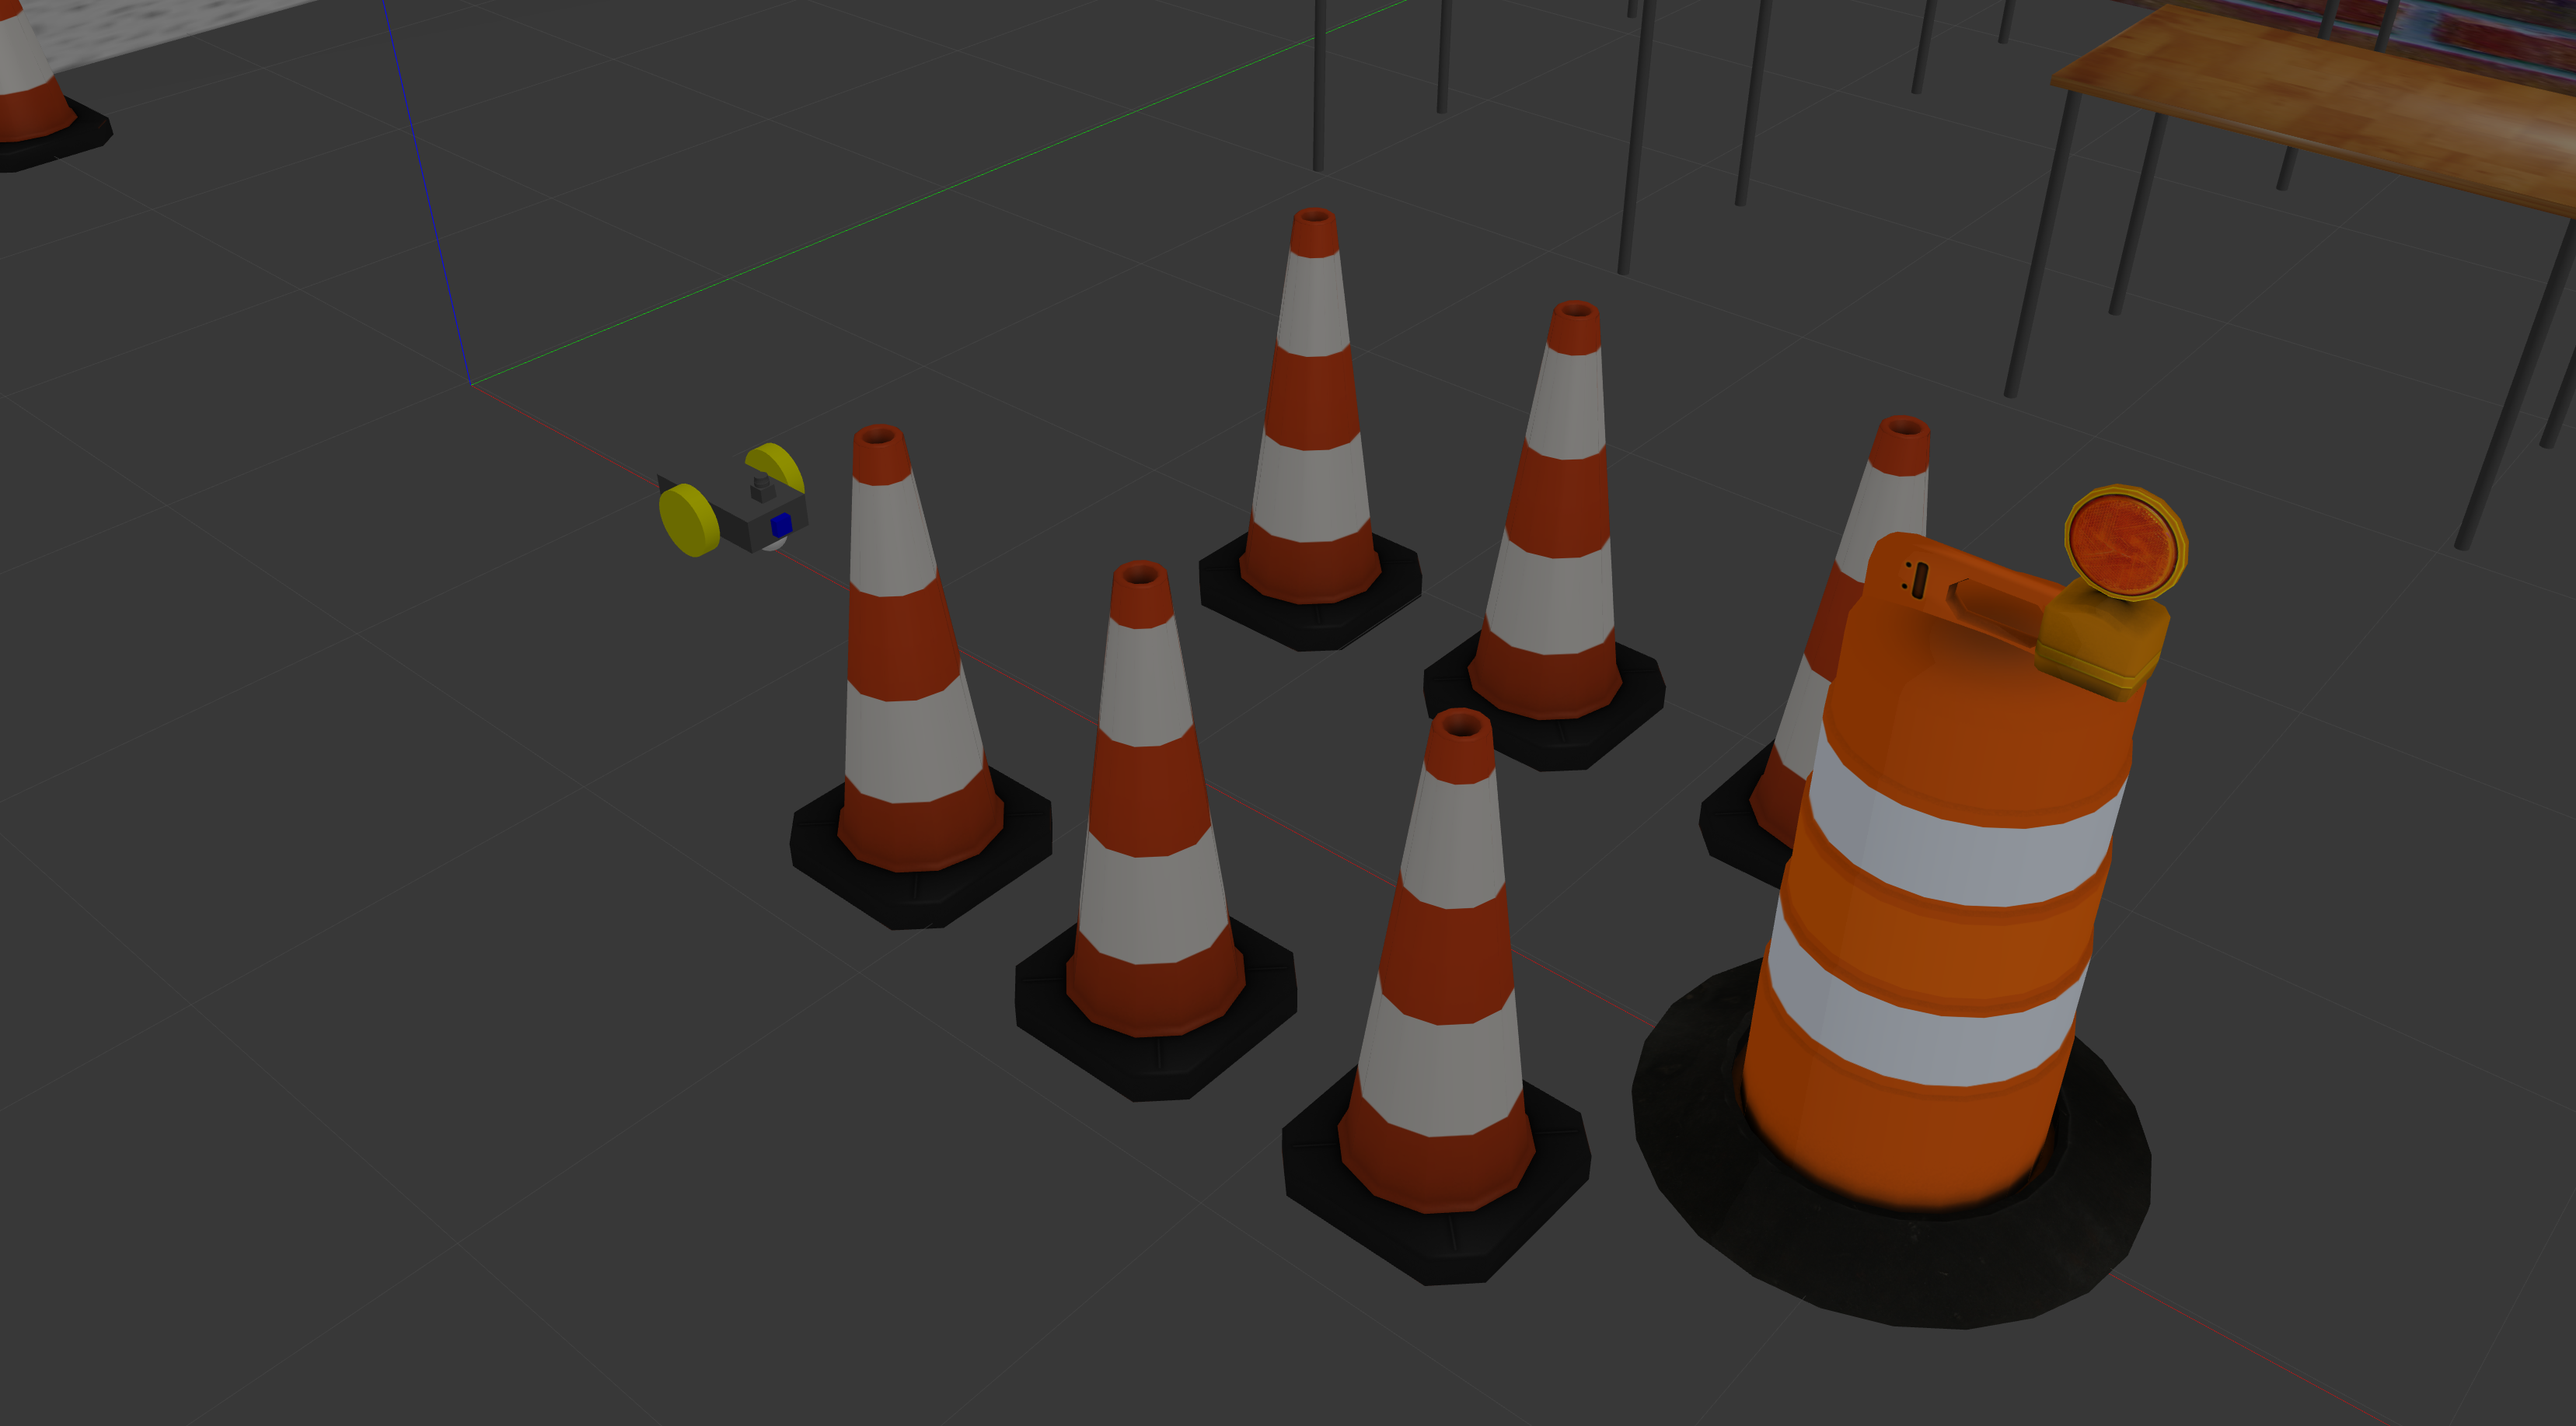
gazebo 상의 로봇이 5초간 전진한 후 멈출 것입니다!! 이 내부적으로 어떤 작업이
이루어졌는지 rqt_graph로 살펴봅시다.
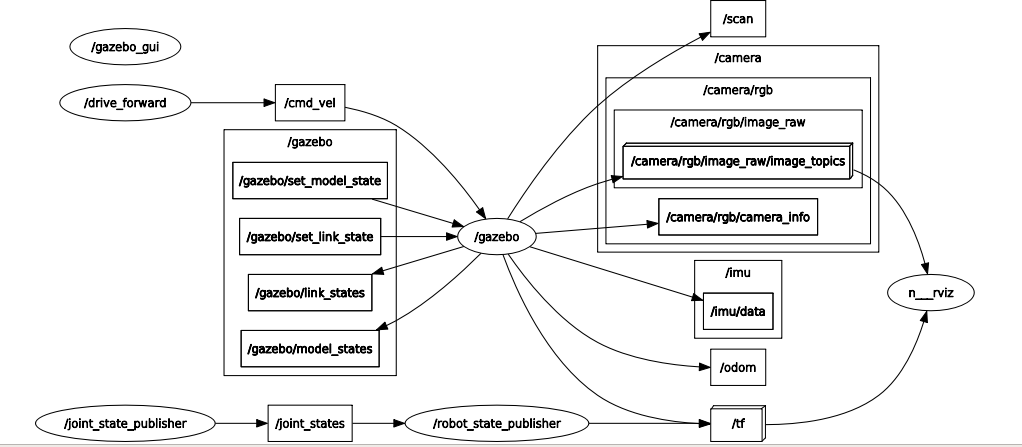
drive_forward라는 새로운 node가 생겼고, 이것이 로봇에게 움직이라는 명령을 준 것 같습니다!! 중간에cmd_vel도 보이네요, 결론부터 말하자면, 본 예제는 gazebo 시뮬레이션 상의 로봇에게 cmd_vel topic publish를 한 것 입니다.
ROS Topic 설명
- 앞선 rqt_graph에서 각 노드들 사이에 화살표는 데이터가 오고 간다는 것을 의미하며, 이를 topic이라 지칭합니다. 정의에 따르면, topic은 ros에서는 데이터가 오가는 길(Bus)의 이름입니다.데이터가 오가는 길

- rostopic 개념도
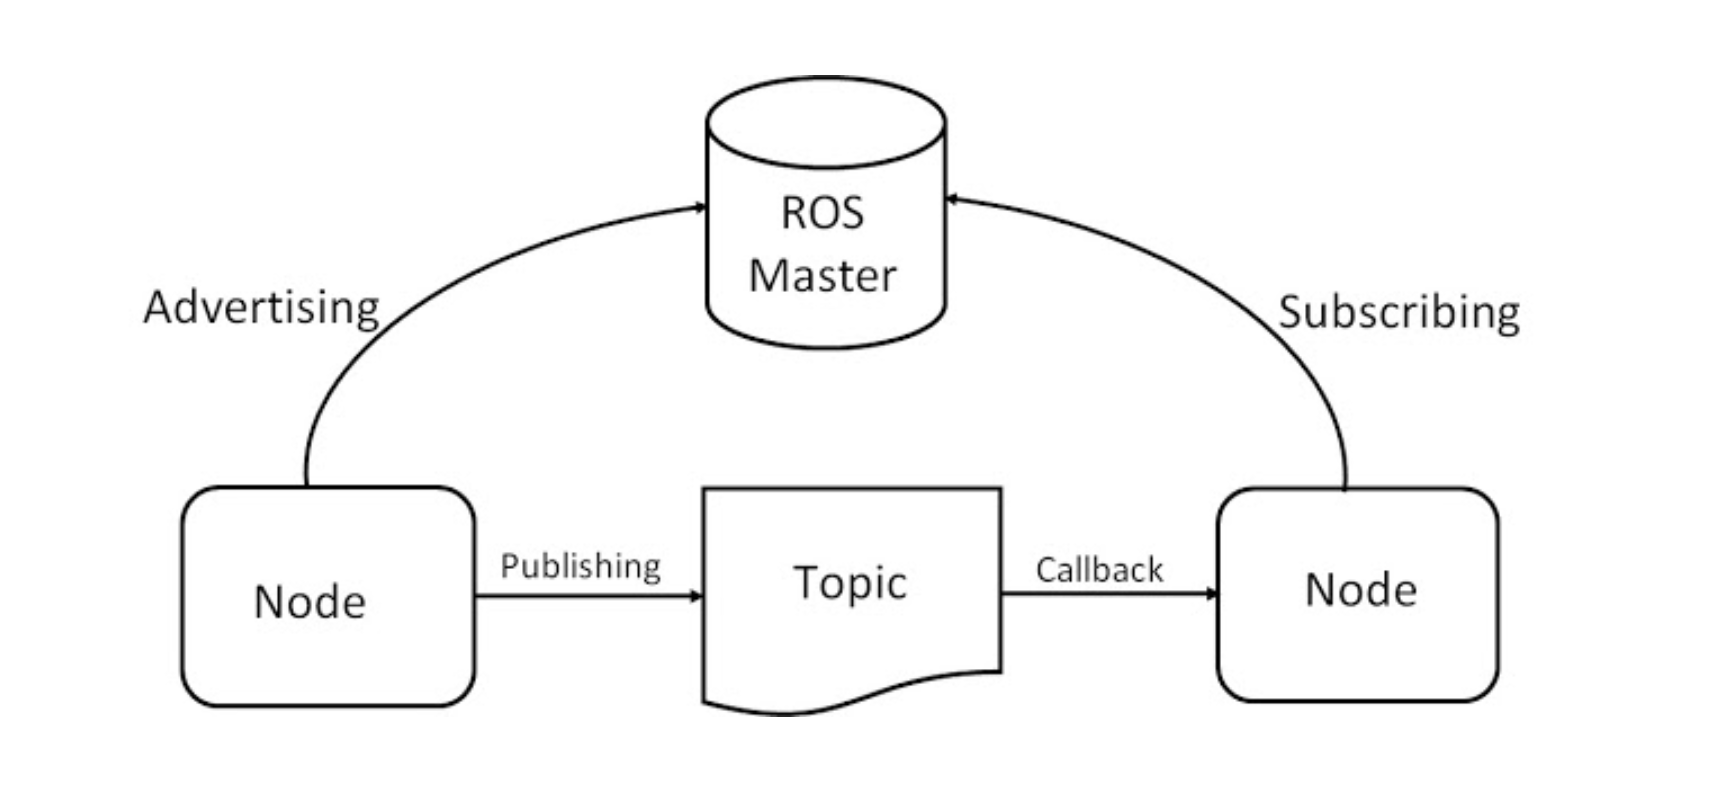
image from : ROBIN ROBOTICS
- topic은 기본적으로 데이터를 송신(publish)하는 node와 데이터를 수신(subscribe)하는 node가 지정되어 단방향(publisher ⇒ subscriber)으로 메세지를 전달합니다.
추가 자료 : subscriber와 publisher가 등록되는 과정
rosmsg
publisher와 subscriber가 데이터를 주고받는 상황을 다시 생각해봅시다.
- ROS 로봇 프로그래밍 시에는 다양한 센서 데이터들이 다뤄집니다.
- 센서 뿐만 아니라, 제어 데이터도 주고 받아야 하죠
ROS에서는 주로 사용되는 이러한 데이터 형식을 message 형태로 제공하며, 사용자가 직접 커스터마이징할 수도 있습니다!!
앞서 사용한 cmd_vel topic은 다음과 같이 geometry_msgs/Twist 형식의 message를 사용합니다.
2차원 평면에서 움직이는 로봇을 위한, 선속도, 각속도를 포함하고 있답니다.
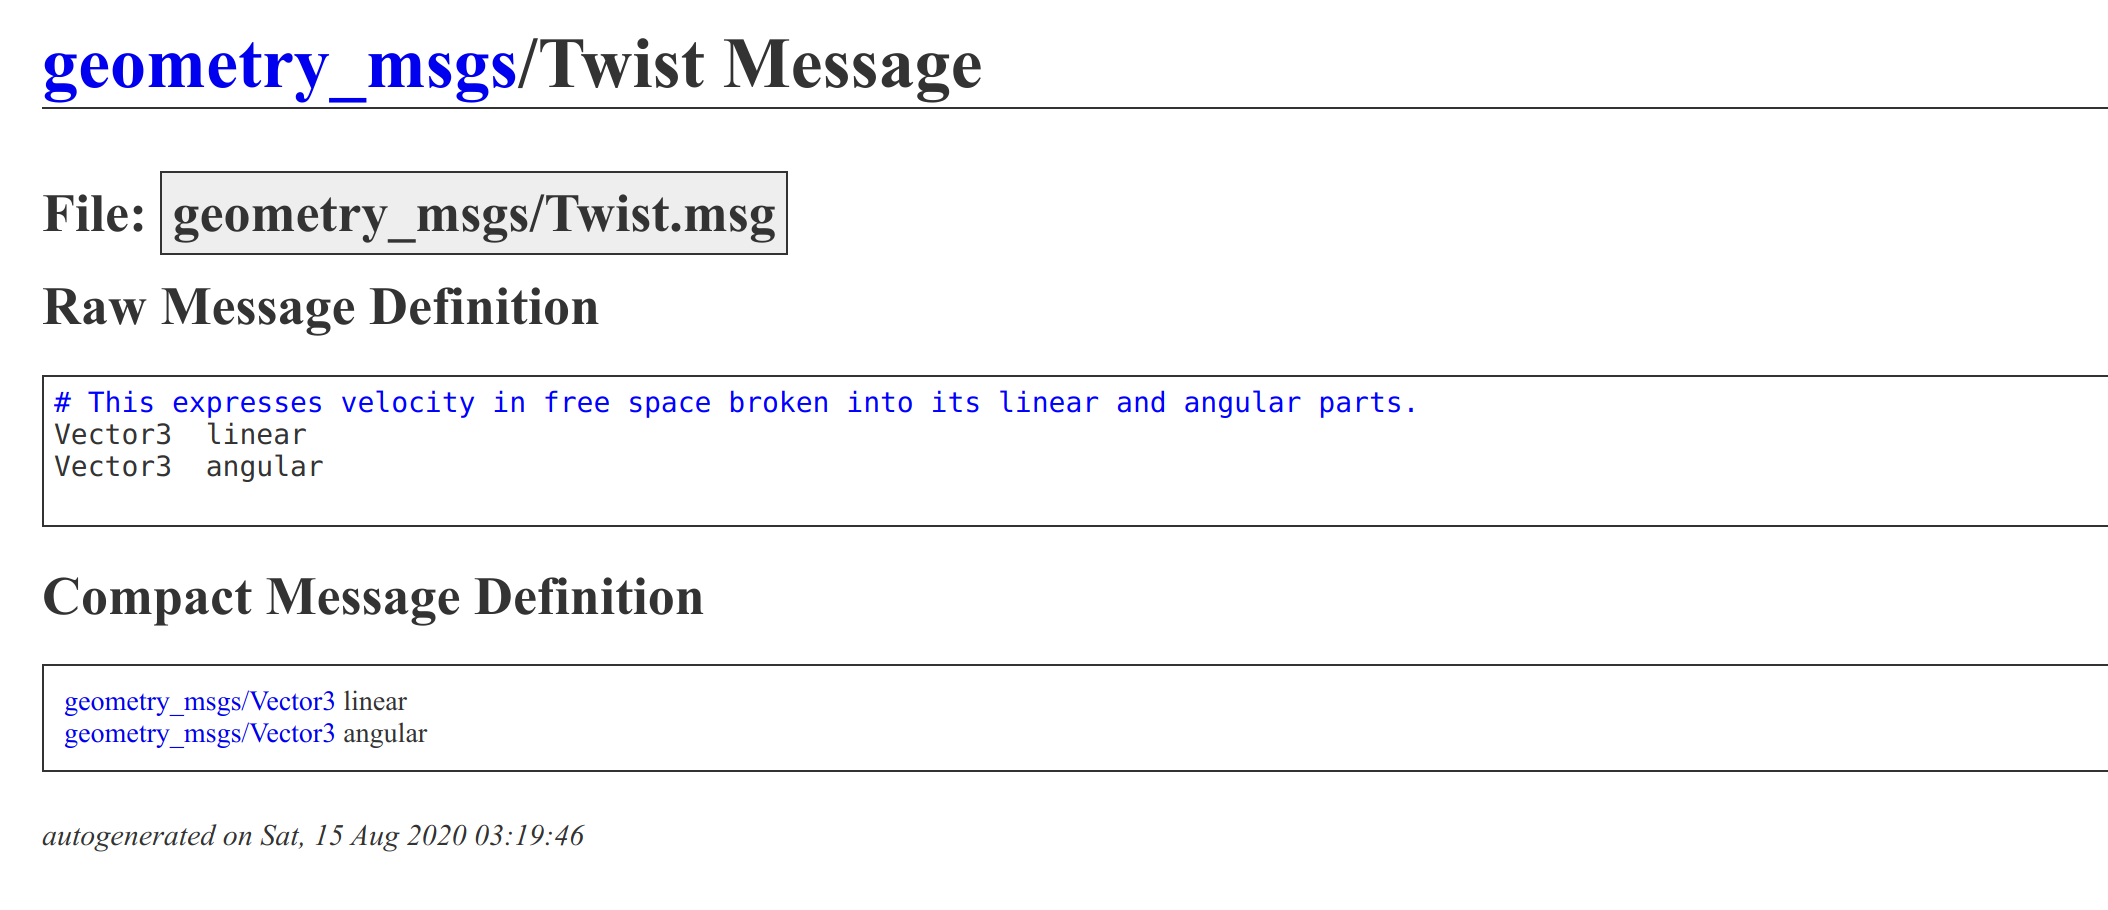
출처 : http://docs.ros.org/
내가 만들고자 하는 topic이 어떤 message type을 사용해야 할 지
선택하기 위한 방법은 다음과 같습니다.
- 오픈소스 프로젝트를 참고 합니다. (거의 대부분의 경우, 만들고자 하는 기능은 다른 사람도 작업해뒀을 확률이 높습니다.)
- 정말 새로운 센서이거나, 특별한 기능의 구현이 필요할 경우, 혹은 기존의 메세지들 중 취합하여 통합된 형태를 만들고 싶다면 ⇒ 직접 메세지를 선언합니다.
본 강의에서는 2번은 다루지 않겠습니다. 링크로 대체합니다.

- 그럼 1번의 접근법으로, 우리가 사용한
drive_forward node는 어떤 message type을 사용했는지 살펴봅시다!
$ roscore

# 새 터미널을 열고
$ rosrun topic_tutorial cmdvel_pub_endless.py
[INFO] [1609900816.425015]: ==== Endless DriveForward node Started ====
본 실습을 위해, 10초 후 끝나는 것이 아닌, 계속해서 publish를 하는 node를 실행시켰습니다.
새로운 터미널을 다시 열고 node list를 볼까요?
$ rosnode list
/drive_forward
/rosout
이 중 우리가 관심있는 /drive_forward에
대한 info를 봅시다.
$ rosnode info /drive_forward
--------------------------------------------------------------------------------
Node [/drive_forward]
Publications:
 * /cmd_vel [geometry_msgs/Twist]
 * /rosout [rosgraph_msgs/Log]

Subscriptions: None

Services:
 * /drive_forward/get_loggers
 * /drive_forward/set_logger_level


contacting node http://localhost:45879/ ...
Pid: 26172
Connections:
 * topic: /rosout
    * to: /rosout
    * direction: outbound (46035 - 127.0.0.1:51464) [9]
    * transport: TCPROS
/cmd_vel topic으로 publish하고 있는 것을 확인했죠? 여기까지
복습이었다면, 이번에는 /cmd_vel와 topic 에 대한 커맨드를 배워봅시다.
# topic list 보는 법
$ rostopic list
/cmd_vel
/rosout
/rosout_agg

$ rostopic info /cmd_vel
Type: geometry_msgs/Twist

Publishers:
 * /drive_forward (http://localhost:45879/)

Subscribers: None

$ rostopic echo /cmd_vel
---
linear:
  x: 0.5
  y: 0.0
  z: 0.0
angular:
  x: 0.0
  y: 0.0
  z: 0.0
---
linear:
  x: 0.5
  y: 0.0
  z: 0.0
angular:
  x: 0.0
  y: 0.0
  z: 0.0
---
(...)
지금 상황에서 drive_forward node는 /cmd_vel topic을 통해 publish하고 있지만, subscribe 해줄 node가 없기에 위와 같은 결과가 나왔습니다.
그럼 rqt_graph도 볼까요?
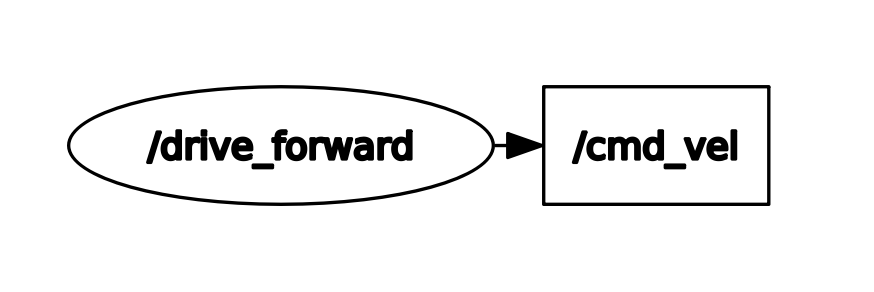
이제, 이전 rqt_graph와 같이 살펴보면서 이해해봅시다.
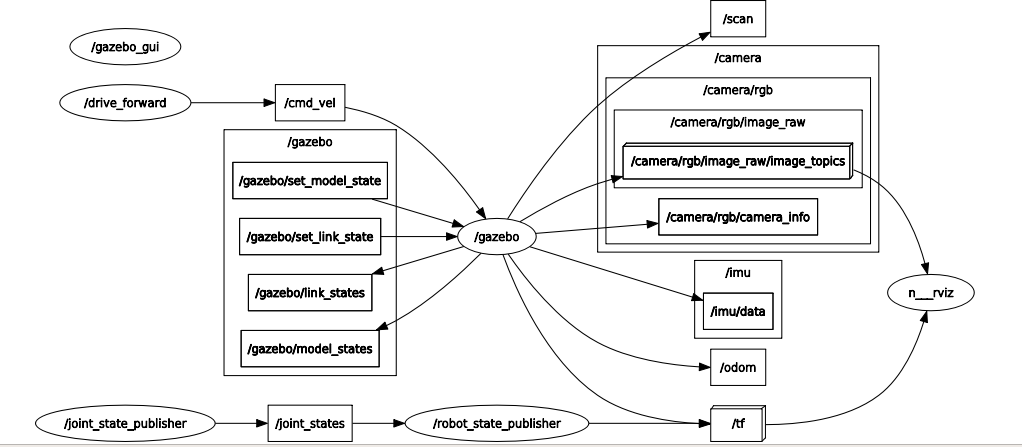
혹시, 앞서 커맨드 라인을 입력하면서, topic_tutorial 패키지와, example1.launch안에 여러 코드들이 어떻게 구성되어있는지 궁금하지 않으셨나요?
패키지 분석
그럼 이제, launch 파일부터 차근차근 살펴볼까요??
- example_1.launch
<?xml version="1.0" encoding="UTF-8"?>

<launch>
    <!-- launch first exmaple -->
    <node pkg="topic_tutorial" type="cmdvel_pub.py" name="drive_forward"  output="screen">
    </node>
</launch>
앞선 강좌에서 pkg, type, name을 건너뛰었는데요, 이제 구체적으로 어떤 의미를 가지는지 알아봅시다.
- pkg="topic_tutorial" : 실행할 코드가 위치한 ROS 패키지의 이름을 기입합니다. (보통 해당 launch file이 위치한 폴더 이름이 될 것입니다.)
- type="python_file_name.py" : topic이 구현된 코드가 담긴 파이썬 파일 이름입니다.
- name="node_name" :
rosnode list시 보았던 것 처럼 이 파일을 실행시키면 drive_forward라는 이름으로 Node가 생성될 것입니다.
- output="screen" : 코드 실행 중 발생시키는 로그를 어떤 채널로 내보낼지 결정합니다.
log, 혹은screen이 사용됩니다.cd ~/.ros/log/
그 밖에도 여러 옵션들이 있으며, 추가 내용은 하단 페이지를 참조하시길 바랍니다.

패키지 (package)에 대해 조금 더 자세히 짚어볼까요?
package
오픈소스 ROS 프로젝트들을 탐험해봅시다!
여러 폴더들이 있는 것을 볼 수 있습니다. 더불어 이름에서 규칙을 찾아볼 수도 있네요
이 폴더들이 모두 패키지입니다.
패키지는 파일 관점에서는 관련된 라이브러리, 모델링 파일들, 설정 파일들을 모아둔 폴더로 생각할 수 있고, 기능 관점에서는 시뮬레이션, 하드웨어 관련, 비전, 모델링 등으로 분리시킨 모듈로 생각할 수 있습니다.
본 이론 과정에서는 제공되는 패키지 위주로 사용하지만, catkin을 사용하여 패키지를 만드는 방법은 다음과 같습니다.
$ cd <work-space>/src
$ catkin_create_pkg <package-name> rospy [depend1] [depend2] [depend3] ...

$ cd ~/gcamp_ws
$ catkin_make
$ source setup/devel.bash
이렇게 package를 만들면 기본적으로 다음과 같은 파일 구조를 갖게되며, roscd를 통해 이 폴더로 올 수 있는 symbolic link도 생성됩니다.
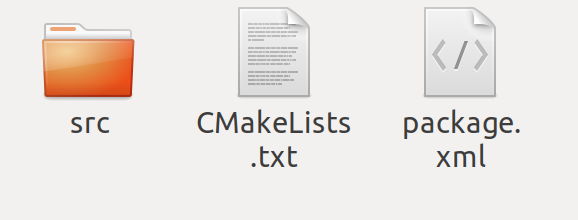
package.xml, CMakeLists.txt에 대한 설명은 다루지 않으며, 링크로 대체하겠습니다.

많은 것들을 배웠습니다!! 다음 시간에는 드디어 코딩을 시작합니다!!
topic publisher와 subscriber를 만들어봅시다 👍👍


